Debugging A Remote Docker Container With Pycharm
Debugging Code in the Era of Big Data Sets, Cloud Platforms and Docker
Say I have a Docker container running in Google Cloud Platform. Inside that container a custom library interacts with huge amounts of data from Google Cloud Storage. In order to debug that library without suffering from latency issues or egress costs I would need to ssh into the VM and from there use docker exec to get into the container. Then I could debug my library using vim or emacs.
I wanted to use the Remote Debugger features of PyCharm, but to set up my remote cloud platform development machine for this I needed to go through a number of step. Below is a step-by-step tutorial of how you can setup a remote VM to run a docker container that you can debug into from your local desktop/laptop.
To complete this tutorial you’ll need a Google Cloud Platform (GCP) account with admin access, you’ll need to have gcloud tools installed on your development machine, and you’ll need to have PyCharm Professional (the standard free edition doesn’t have remote debugging installed). Understanding some basics off ssh, command line tools and Docker will make this a lot easier.
Notes on the format of the blog: Wherever possible I try to use bold type for user interface elements that you’ll interact with, italics type for filenames, directory names and values you’ll enter in fields, and code blocks will be reserved for code examples and bash commands. I’m human, there will be errors.
This tutorial was completed using the following versions:
- PyCharm Professional: 2017.1.4
- GCP VM Image Container-Optimized OS: 59.9460.64.0 stable
- GCP VM Image Docker version: 1.11.2
- gcloud Google Cloud SDK: 159.0.0
- Mac OS: El Capitan 10.11.6 (but this all should work from Windows or Linux as PyCharm is cross platform)
Github repos that will be used in the tutorial: https://github.com/davidraleigh/blog-remote-debug-python https://github.com/davidraleigh/remote-debug-docker
Firewall Rules
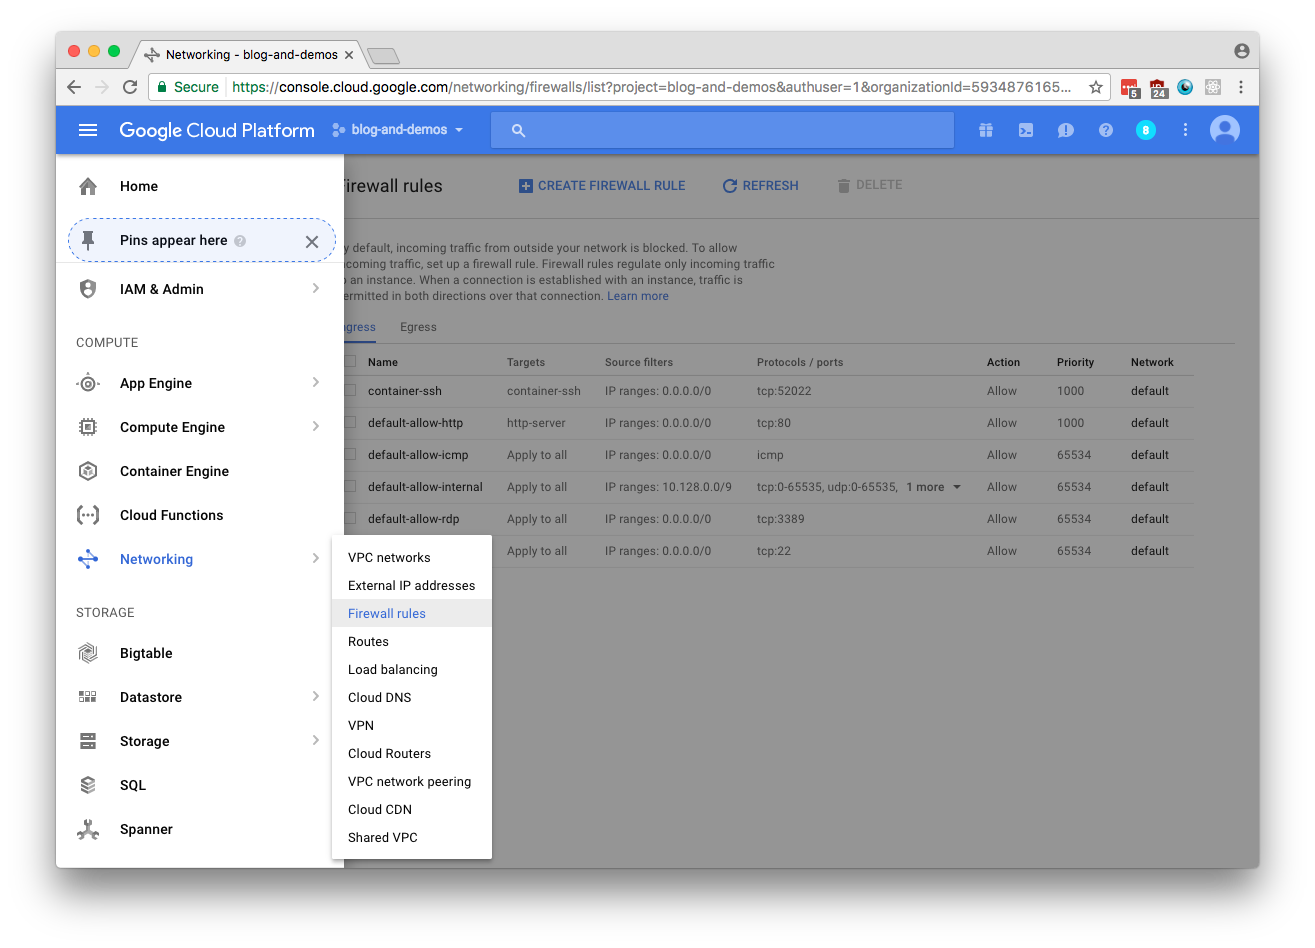
First off you’ll need to create a new firewall rule for your project so you can ssh into the Docker Container’s port. We’ll use the port number 52022. Go to the table of contents in Google cloud and select Networking and then the Firewall Rules:
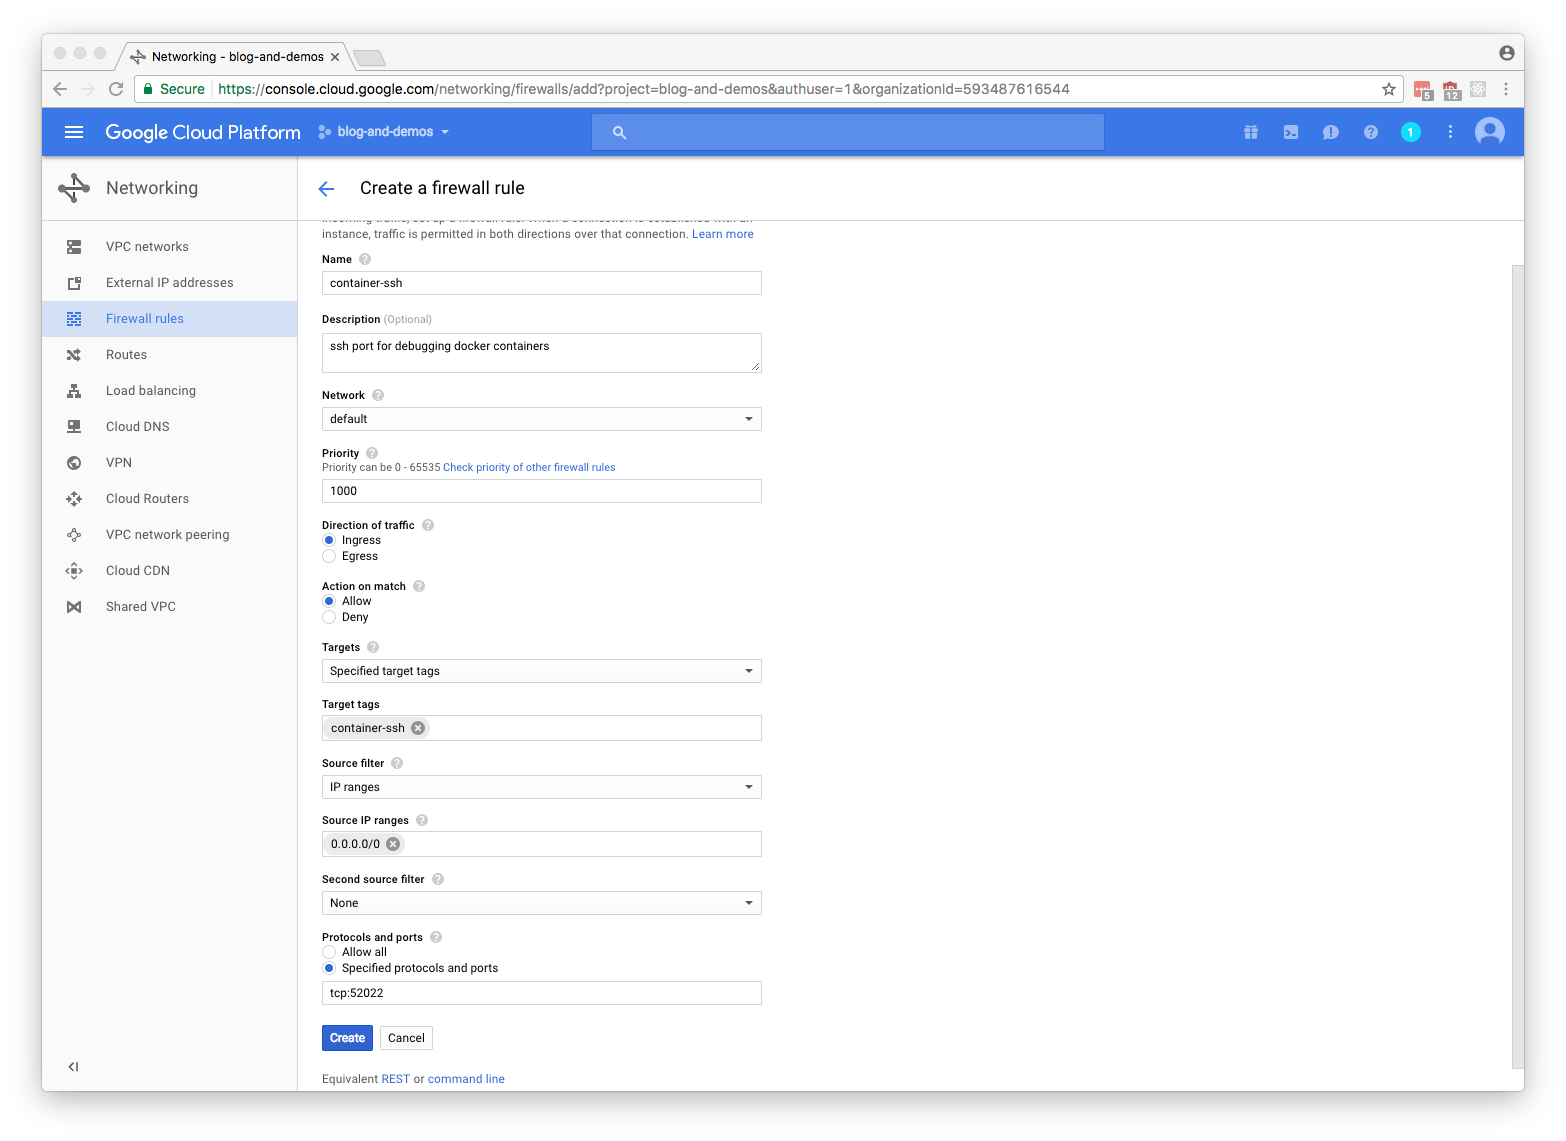
The fields you’ll have to edit are Name, Target Tags, Source IP ranges, and Protocols and ports. You should add a description, but that’s optional. If you want to specify that only your IP address can access the machine you should define the Source IP ranges as something besides 0.0.0.0/0. Below you can see all the settings I’ve used, if you copy all these settings this tutorial should work:
Create VM with Proper Permissions
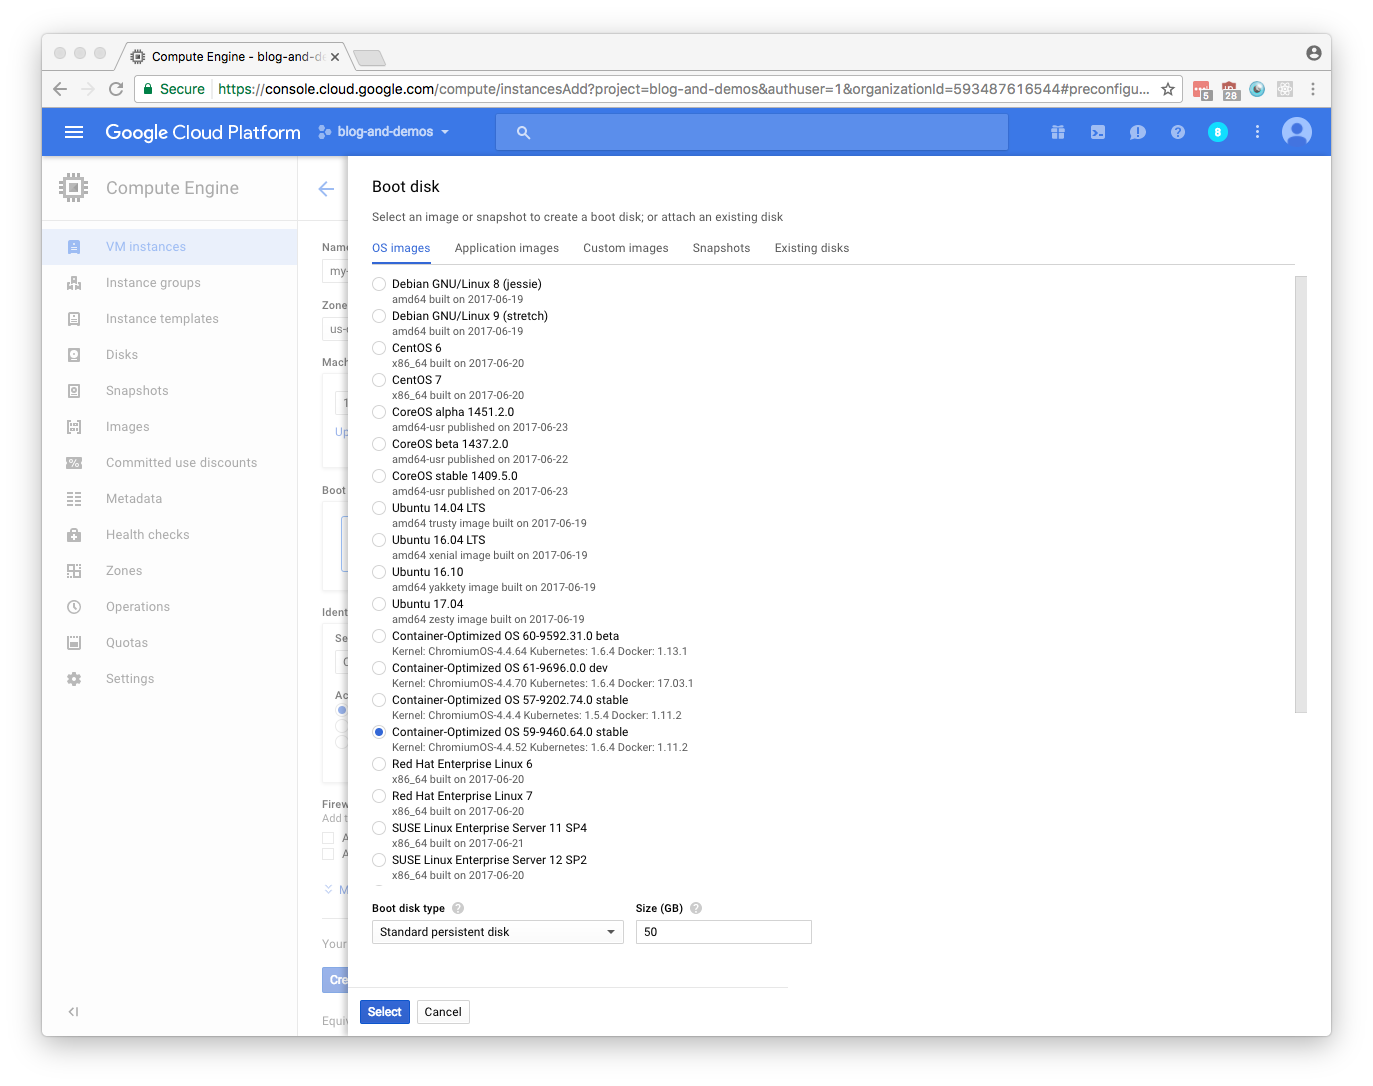
Go to Compute Engine in GCP console table of contents and select Create an Instance. You’ll want to change the Boot disk to be a docker enabled image (in this case the Container-Optimized OS, a Chromium OS) and maybe increase the size beyond 10 gigs if you plan on using this for development of lots of different docker images (images can be pretty damn large):
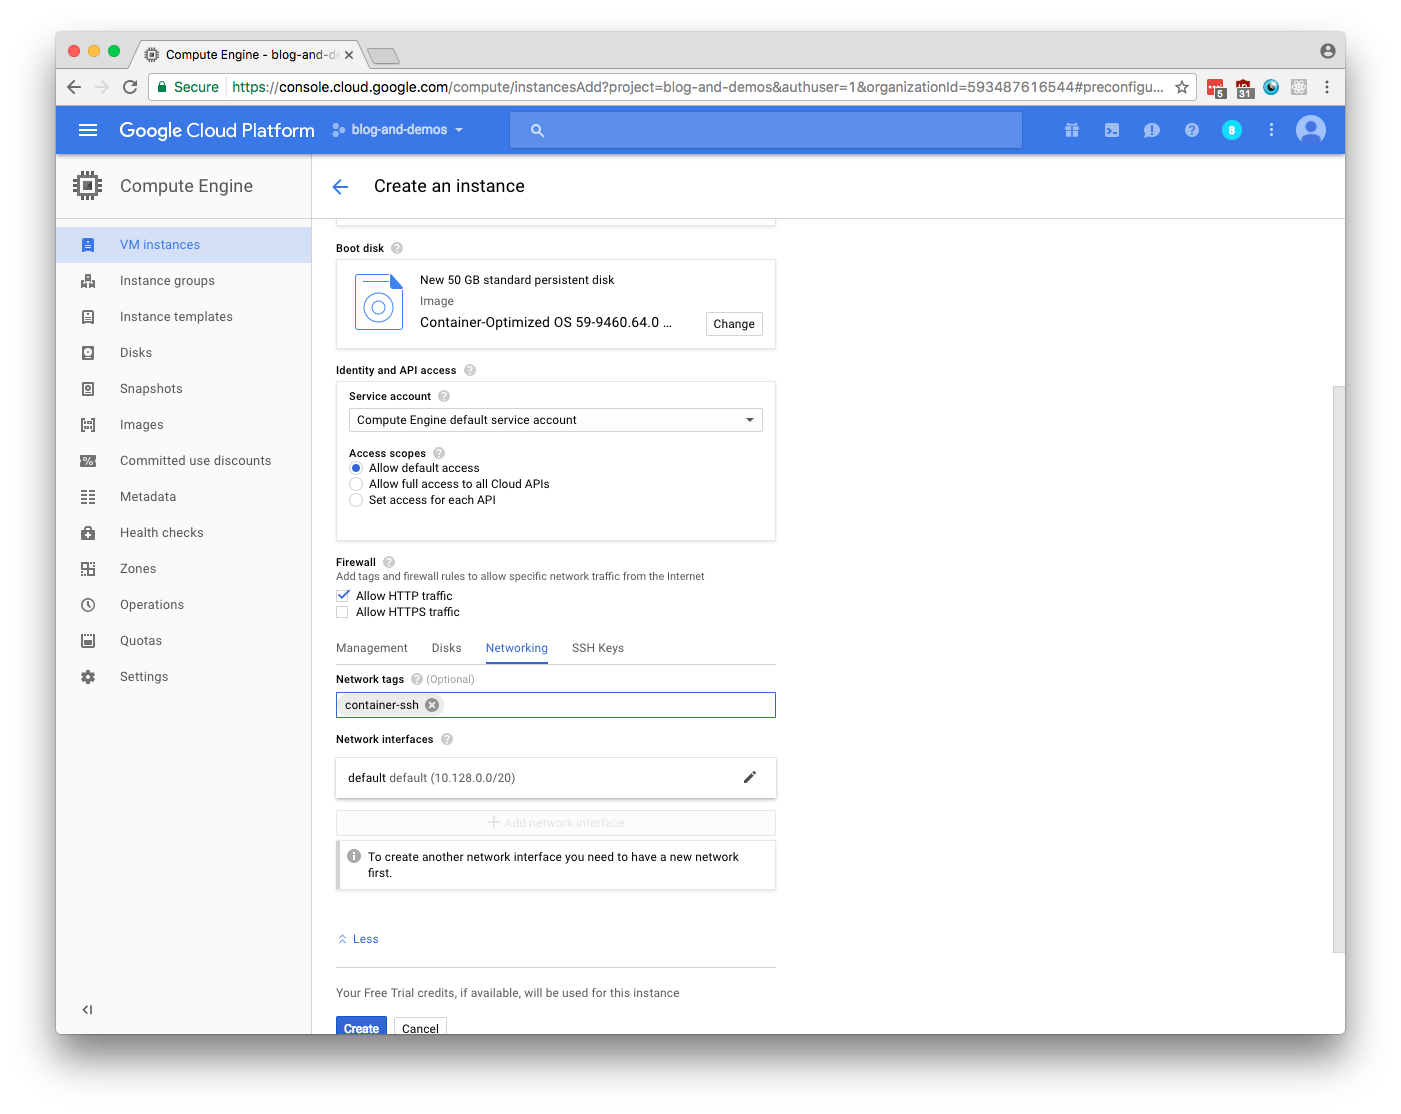
Under the Firewall section of your instance creation dialog select the Allow HTTP traffic field. You may need to check with your Networking Firewall rules to make sure that port 80 is open for your IP address (by default GCP projects make it open to all addresses). Below the Firewall section you’ll need to select the Networking tab and place the Target Tags you defined earlier in the Firewall section of this tutorial (mine was container-ssh) in the Network tags field:
Once you’ve finished these settings Create your VM and you should be ready to get your VM ready for debugging.
Get a Docker Image with Updated Source Code on your Remote Development VM
You can either SSH onto your machine and clone the repo to debug onto your VM and build it (great if you have a slow connection at your local machine and you don’t want to push an image into your container registry). Or you can build your test image locally, push it to your container registry of choice and then pull from that registry onto your remote VM.
Git Clone your Code onto the Remote Development VM
SSH into your remote VM (in my case remote-debug-demo) and use git to clone the following repo:
# from your local machine use gcloud to ssh in
gcloud compute --project "blog-and-demos" ssh --zone "us-central1-f" "remote-debug-demo"
sudo mkdir /opt/src
cd /opt/src
sudo git clone https://github.com/davidraleigh/blog-remote-debug-python
Once your source code is there in your remote VM you’ll want to build your Docker image:
cd /opt/src/blog-remote-debug-python
sudo docker build -t your-special-image-name .
sudo docker tag your-special-image-name test-image
Pull an Updated Image to Your Remote Development VM
If you’ve already pushed your test image to an image repository (Docker Hub Registry, Google Container Registry, etc.)then you can SSH onto your remote VM and pull it down (this example uses GCR):
# from your local machine use gcloud to ssh in
gcloud compute --project "blog-and-demos" ssh --zone "us-central1-f" "remote-debug-demo"
sudo gcloud docker -a
sudo gcloud docker pull gcr.io/your-project-name/your-special-image-name
sudo docker tag gcr.io/your-project-name/your-special-image-name test-image
Create a Debug Image
In order to debug your code with PyCharm you must be able to SSH into the running docker container. Rather than screw up your project’s Dockerfile, we’ll just use a Dockerfile that inherits from the image you want to use as your remote debugging image.
Get a Debugable SSH Server Enabled Dockerfile Project
The easiest way to do this is to use the Dockerfile and associated supervisord configuration files from the https://github.com/davidraleigh/remote-debug-docker repo. In your VM, clone this repo and follow the repo’s instructions:
# from your local machine use gcloud to ssh in
gcloud compute --project "blog-and-demos" ssh --zone "us-central1-f" "remote-debug-demo"
cd ~/
sudo git clone https://github.com/davidraleigh/remote-debug-docker
Copy in SSH Public Key
In order to build a Docker image that has the ssh public key to approve your request you’ll need to print it to the authorized_keys file. Copy your google cloud google_compute_engine.pub public ssh key to your remote VM. It is the key that google created when you installed gcloud and setup your account and configuration for GCP (at some point you should have executed the following commands: gcloud auth login, gcloud auth activate-service-account and gcloud config set project). So from your local dev maching you’ll execute the following commands:
# remote-debug-docker should have been created in your previous ssh and git clone in your remote VM
gcloud compute copy-files ~/.ssh/google_compute_engine.pub davidraleigh@remote-debug-demo:/home/davidraleigh/remote-debug-docker/ --zone=us-central1-f
Get PyCharm Helper Functions on Remote Development VM (optional)
The last thing you’ll need for this all to work is to get a hold of the pycharm remote debug helpers that Pycharm installs on any remote debug machine. This is a little tricky. How I’ve done this in the past is that I’ve setup a remote debug VM with PyCharm and then gone into that remote VM and copied the ~/.pycharm_helpers to a google storage location for later use. It’d be nice if pycharm just provided a distribution location for those helpers instead of having PyCharm copy them over the first time you connect to a remote machine. If you can’t get a copy of the .pycharm_helpers directory you can just make an empty directory.
(Optional) Saves Time Connecting to Remote Machine First Time
gcloud compute --project "blog-and-demos" ssh --zone "us-central1-f" "remote-debug-demo"
cd ~/remote-debug-docker/
sudo gsutil cp -r gs://raleigh-data/2017.1.4/.pycharm_helpers ./
If Above Optional Doesn’t Work for You
gcloud compute --project "blog-and-demos" ssh --zone "us-central1-f" "remote-debug-demo"
cd ~/remote-debug-docker/
sudo mkdir pycharm_helpers
Side-Note After you’ve run your container once, if you don’t have a copy of .pycharm_helpers in google storage, you can extract them from your container and that way new images you built will already have them. You can even upload them to your google storage directory:
gcloud compute --project "blog-and-demos" ssh --zone "us-central1-f" "remote-debug-demo"
cd ~/remote-debug-docker/
# copy from your docker container to your remote vm, so each new build has a copy of the helpers and your local
# pycharm ide doesn't have to upload them each time you create a new image
sudo docker cp temp-python-debug:/root/.pycharm_helpers ./
# upload your pycharm helpers so that you can download them to a new remote vm in the future (or some other team
# can benefit from your pycharm_helpers)
sudo gsutil cp -r .pycharm_helpers gs://raleigh-data/2017.1.4/
Build Your Debug Image and Get it Running
Now you’ve tagged your development image with the name test-image and you’ve gotten your remote-debug-docker directory setup for creating a Docker container you can ssh into.
First let’s build the debug-image:
gcloud compute --project "blog-and-demos" ssh --zone "us-central1-f" "remote-debug-demo"
cd ~/remote-debug-docker/
sudo docker build -t debug-image .
Now that we have built our image let’s run it and hook up all the ports so we can access it from outside GCP. The port 52022 of our remote VM is mapped to the Docker container’s port 22. And for the purpose of this tutorial we’re using flask and therefore mapping the port 5000 from the Docker container to the VM’s port 80. --privileged is necessary for running supervisord:
gcloud compute --project "blog-and-demos" ssh --zone "us-central1-f" "remote-debug-demo"
cd ~/remote-debug-docker/
sudo docker run -p 52022:22 -p 80:5000 -it --privileged --name=temp-python-debug debug-image
Now you should be able to ssh into this container from your local dev machine. I’ve assigned my remote dev VM a static ip address in Google in order to minimize hassle if the machine shuts down (of course this ip address will be abandoned after I’ve finished writing the blog):
ssh -i ~/.ssh/google_compute_engine root@130.211.210.118 -p 52022
Setup PyCharm Development Environment for Debugging
In PyCharm start a new Flask project called blog-remote-debug-python. Leave the Interpreter option set to whatever is the current default of your PyCharm environment.

If you’ve created a new project instead of cloning the blog-remote-debug-python repo then you’ll need to update the blog-remote-debug-python.py file to match the one in this repo. The only thing that is different from PyCharm’s default Flask app is that the __main__ method has been changed from:
app.run()
to:
app.run(debug=True, host='0.0.0.0')
The reason for this is explained in a Docker forum here
In PyCharm you should be able to select ^R on your keyboard and run this flask project and open your browser to http://0.0.0.0:5000/ and see a “Hello World!” message. Press the “Stop” button in PyCharm’s Navigation Bar to end the Flask app.
Now let’s add a Dockerfile to the project. Copy the file from this repo into your blog-remote-debug-python directory.
On your local dev machine build this image and run it:
cd ~/my-fancy-code-location/blog-remote-debug-python
docker build -t local-test-image .
docker run -p 5000:5000 -it --name=temp-c-flask temp
Open your browser to http://0.0.0.0:5000/ and again you should see a “Hello World!” message.
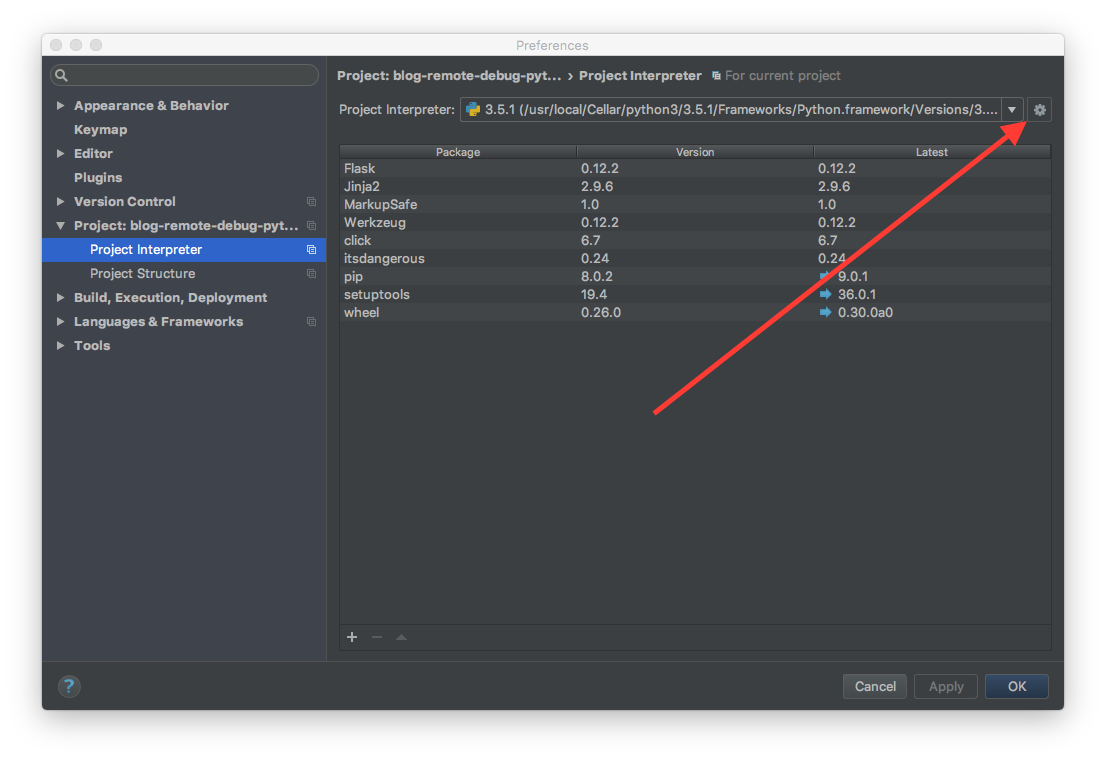
Now that we know the image can create a functioning docker container let’s see how this works with PyCharm’s remote debugger settings. In PyCharm->Preferences we’ll select the Project Interpreter from the lefthand table of contents. To the right of the currently defined interpreter is a cog symbol, like a gear, select that cog button and a drop-down will appear. From the dropdown select Add Remote:
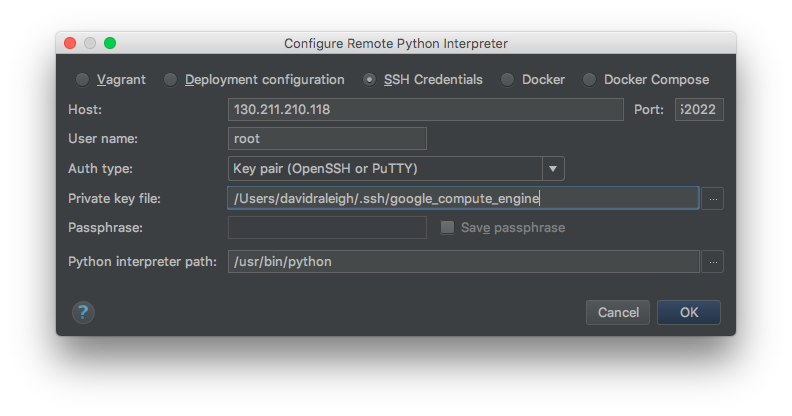
In the Configure Remote Python Interpreter Diaglog select the SSH Credentials radio button. For the Host field you’ll enter in your remote development VM IP address (in my case 130.211.210.118). For Port you’ll change the default 22 to 52022. Remember that the remote VM is already using 22 as it’s SSH port, so for us to access the remote VM’s Docker Container SSH port we mapped the container’s port 22 to the VM’s port 52022 (that’s why we added the 52022 firewall rule). The Username field will be root, as that’s what we defined in the Dockerfile in the https://github.com/davidraleigh/remote-debug-docker repo. In the Auth type dropdown select Key Pair and then point to the google_compute_engine private key that is the pair to the google_compute_engine.pub file you copied inside of your container. The Python interpreter path is the location of the python interpreter on your Docker container:
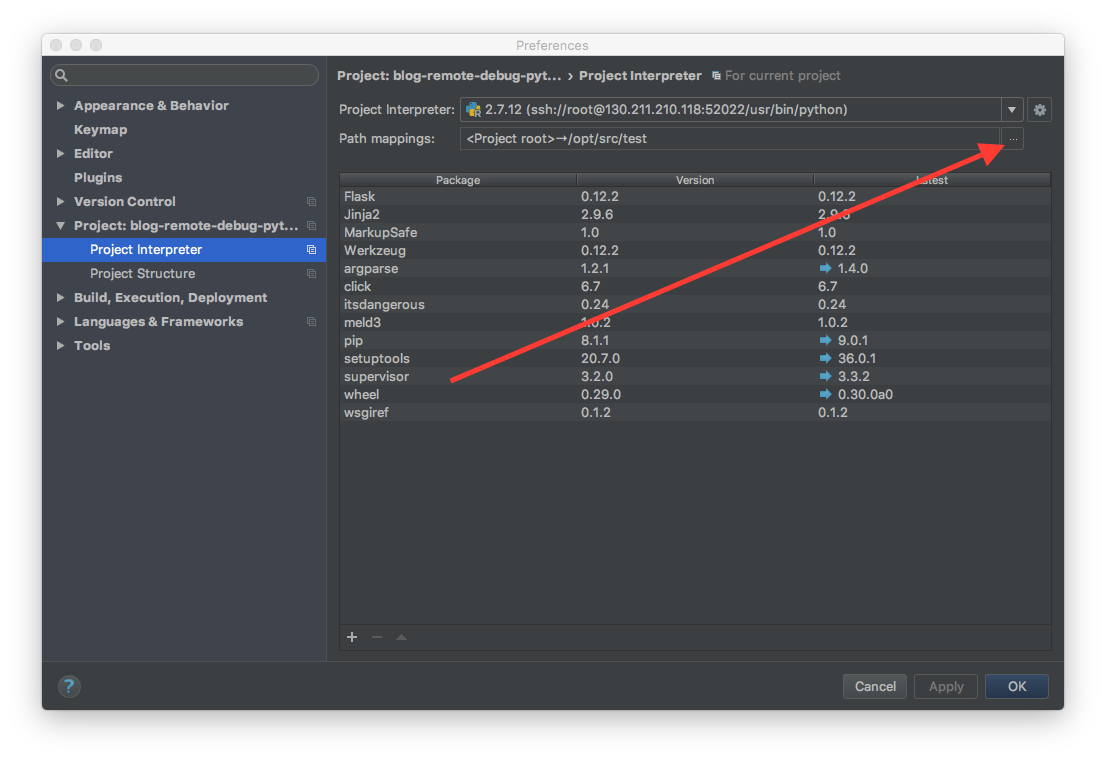
Once you’ve selected OK you’ll be taken back to the Project Interpreter dialog. If you weren’t able to copy the pycharm_helpers from above, you’ll see PyCharm running a background process where it is uploading all the debug utilities necessary for remote debug.
With your newly created interpreter selected in the Project Interpreter drop down you’ll want to update the Path mappings field by selecting the Ellipsis, …, button:
In the Edit Project Path Mappings dialog you’ll set the mapping for your local source to the location of your source code inside of your container. In the case of the tutorial the location of the source code is defined in the Dockerfile at this line, COPY . /opt/src/test. Your dialog should look something like this:
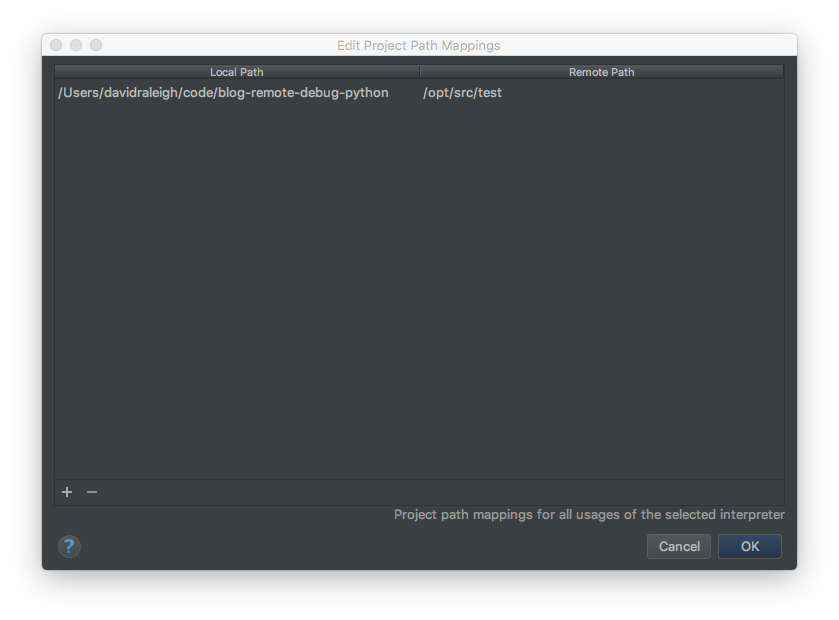
Technically, the above Path Mappings step could be skipped by doing the Deployment Configuration steps below.
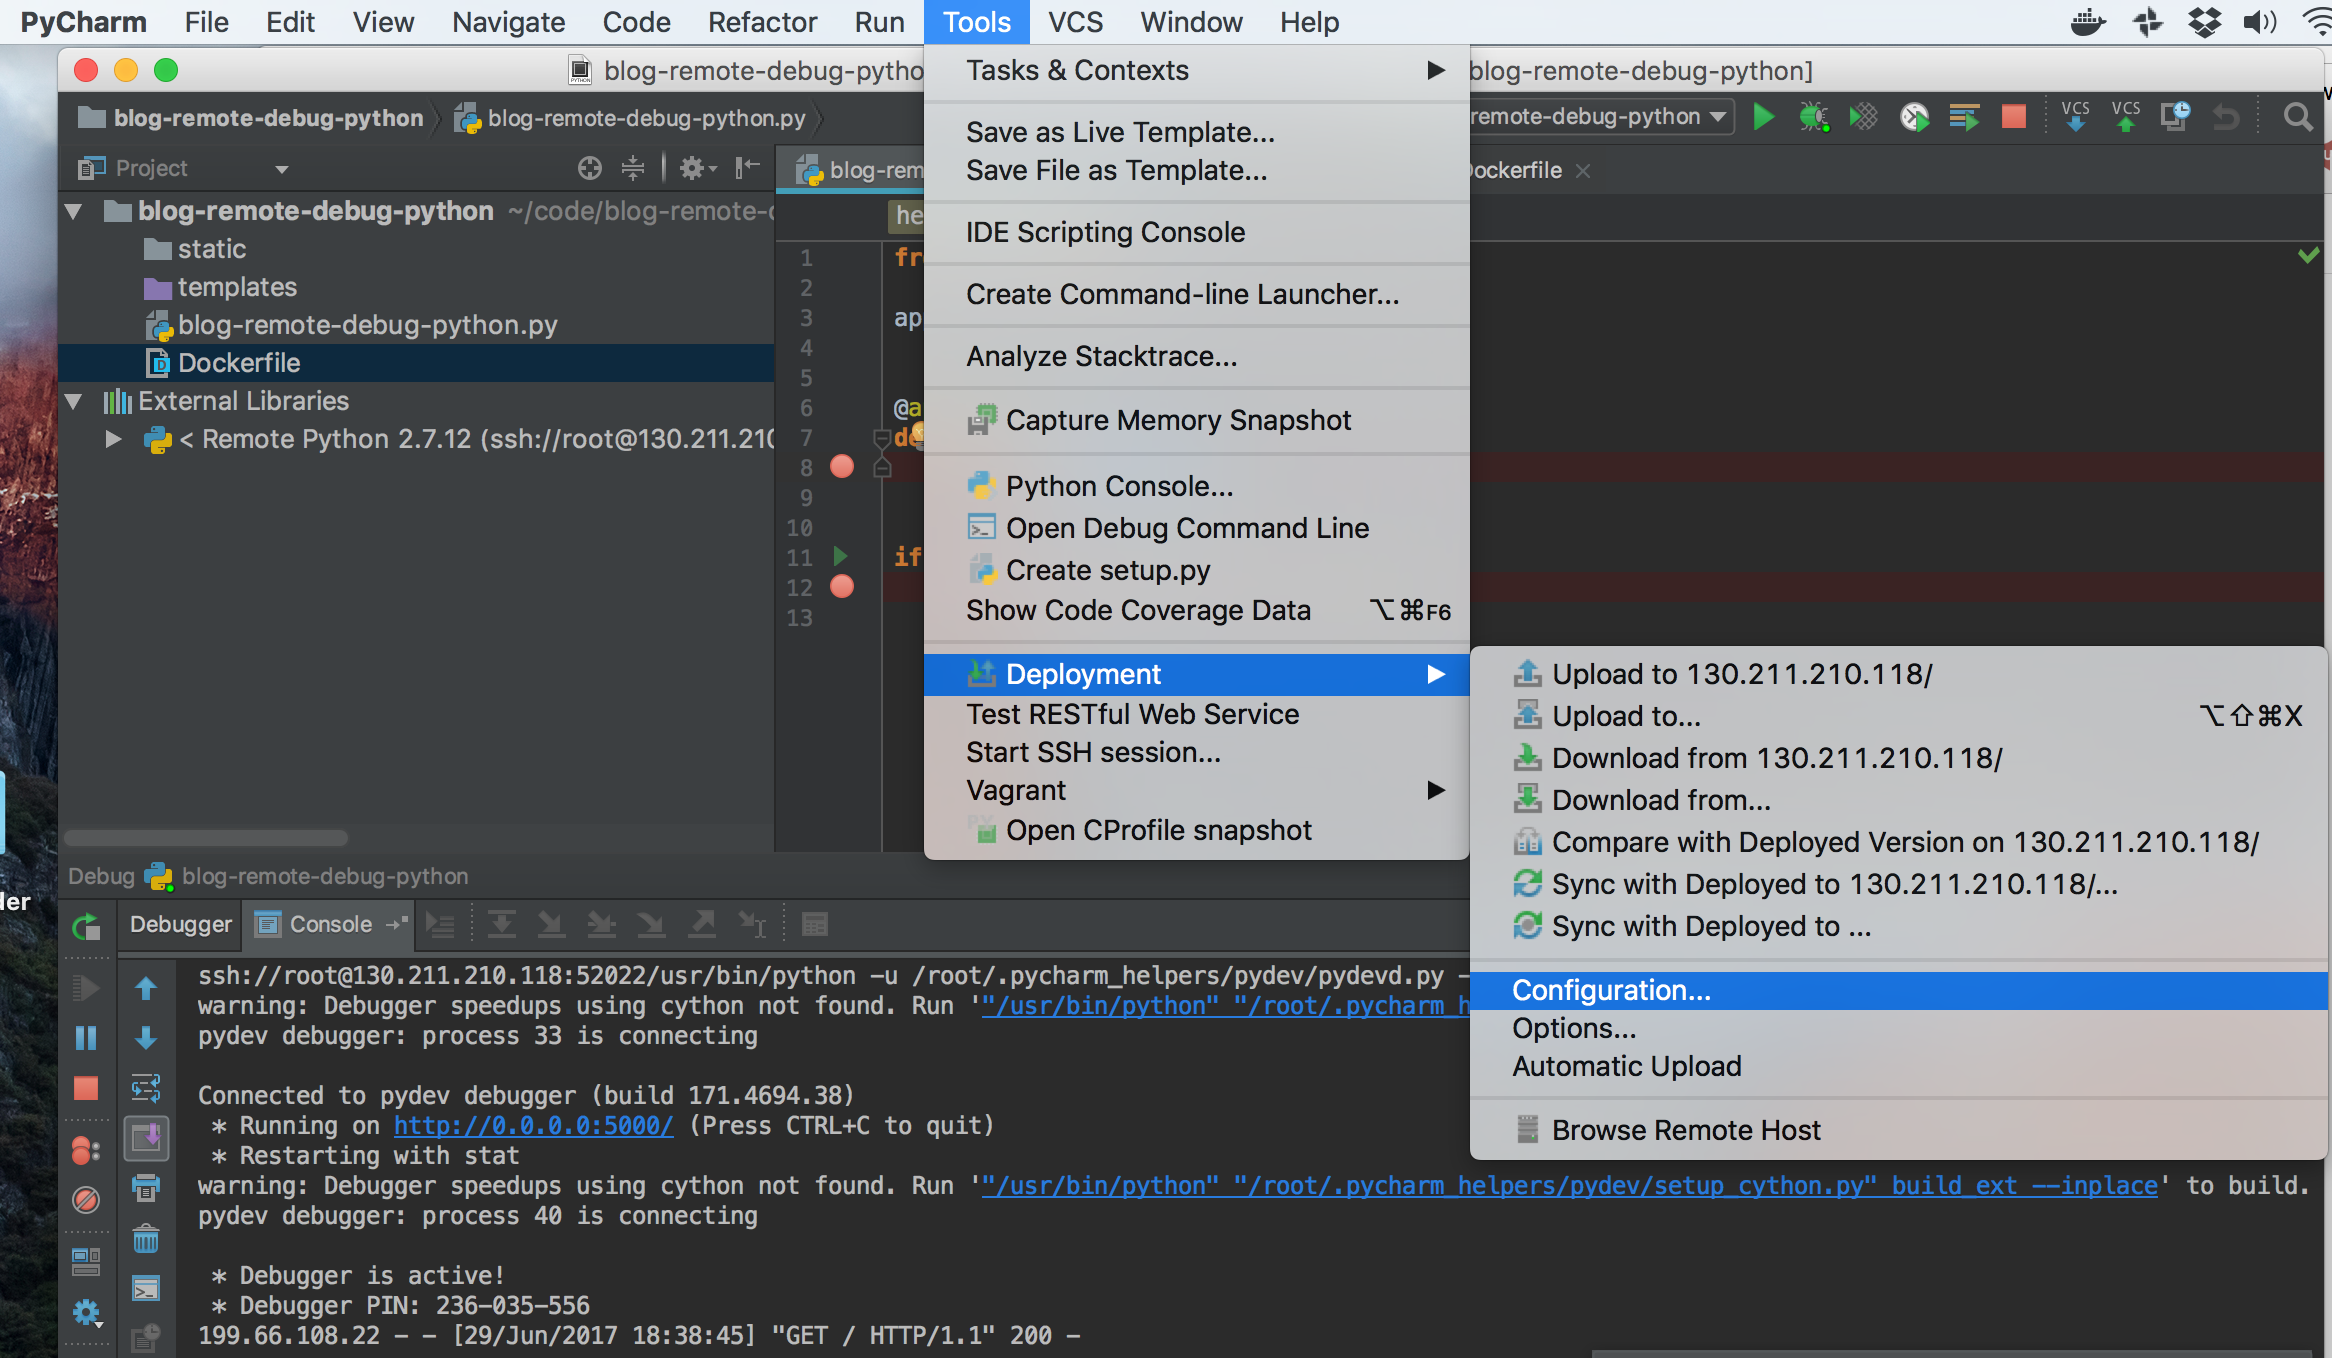
In order to keep your local source code and your remote source in sync you have to setup a Deployment Configuration. This isn’t a deployment in the sense of something that your users will interact with. Select Tools->Deployment->Configuration:
In the Add Server dialog give your server a name and from the Type dropdown select SFTP.
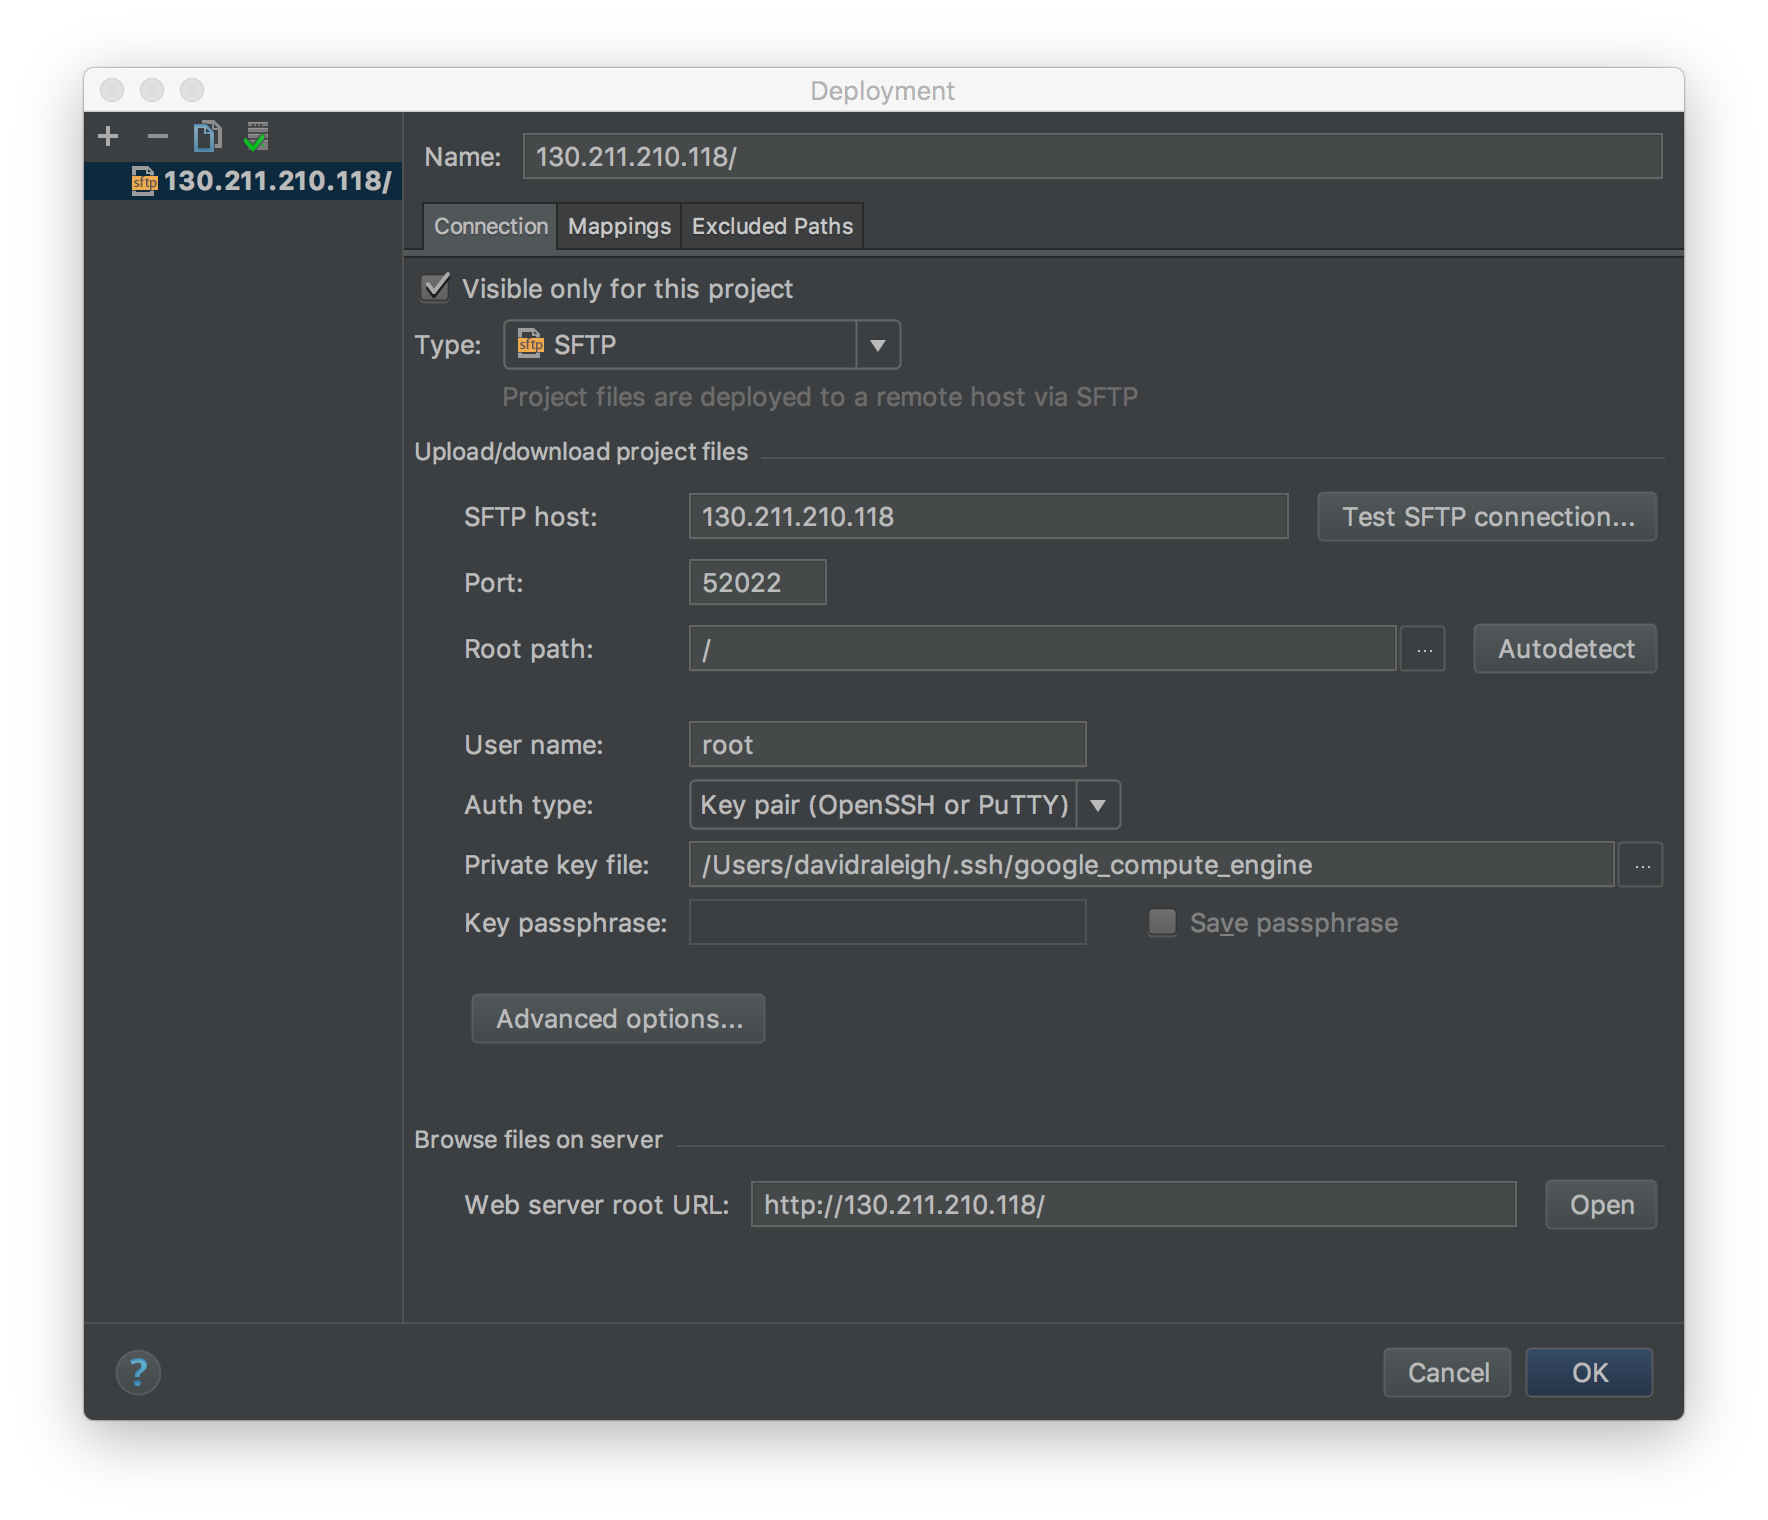
In the Deployment dialog, the Connection tab should be filled out similarily to the the Configure Remote Python Interpreter dialog. for the Root Path field select the base path for this tutorial. Once you’ve filled out the fields press the Test FTP connection… button to confirm you’re able to connect:
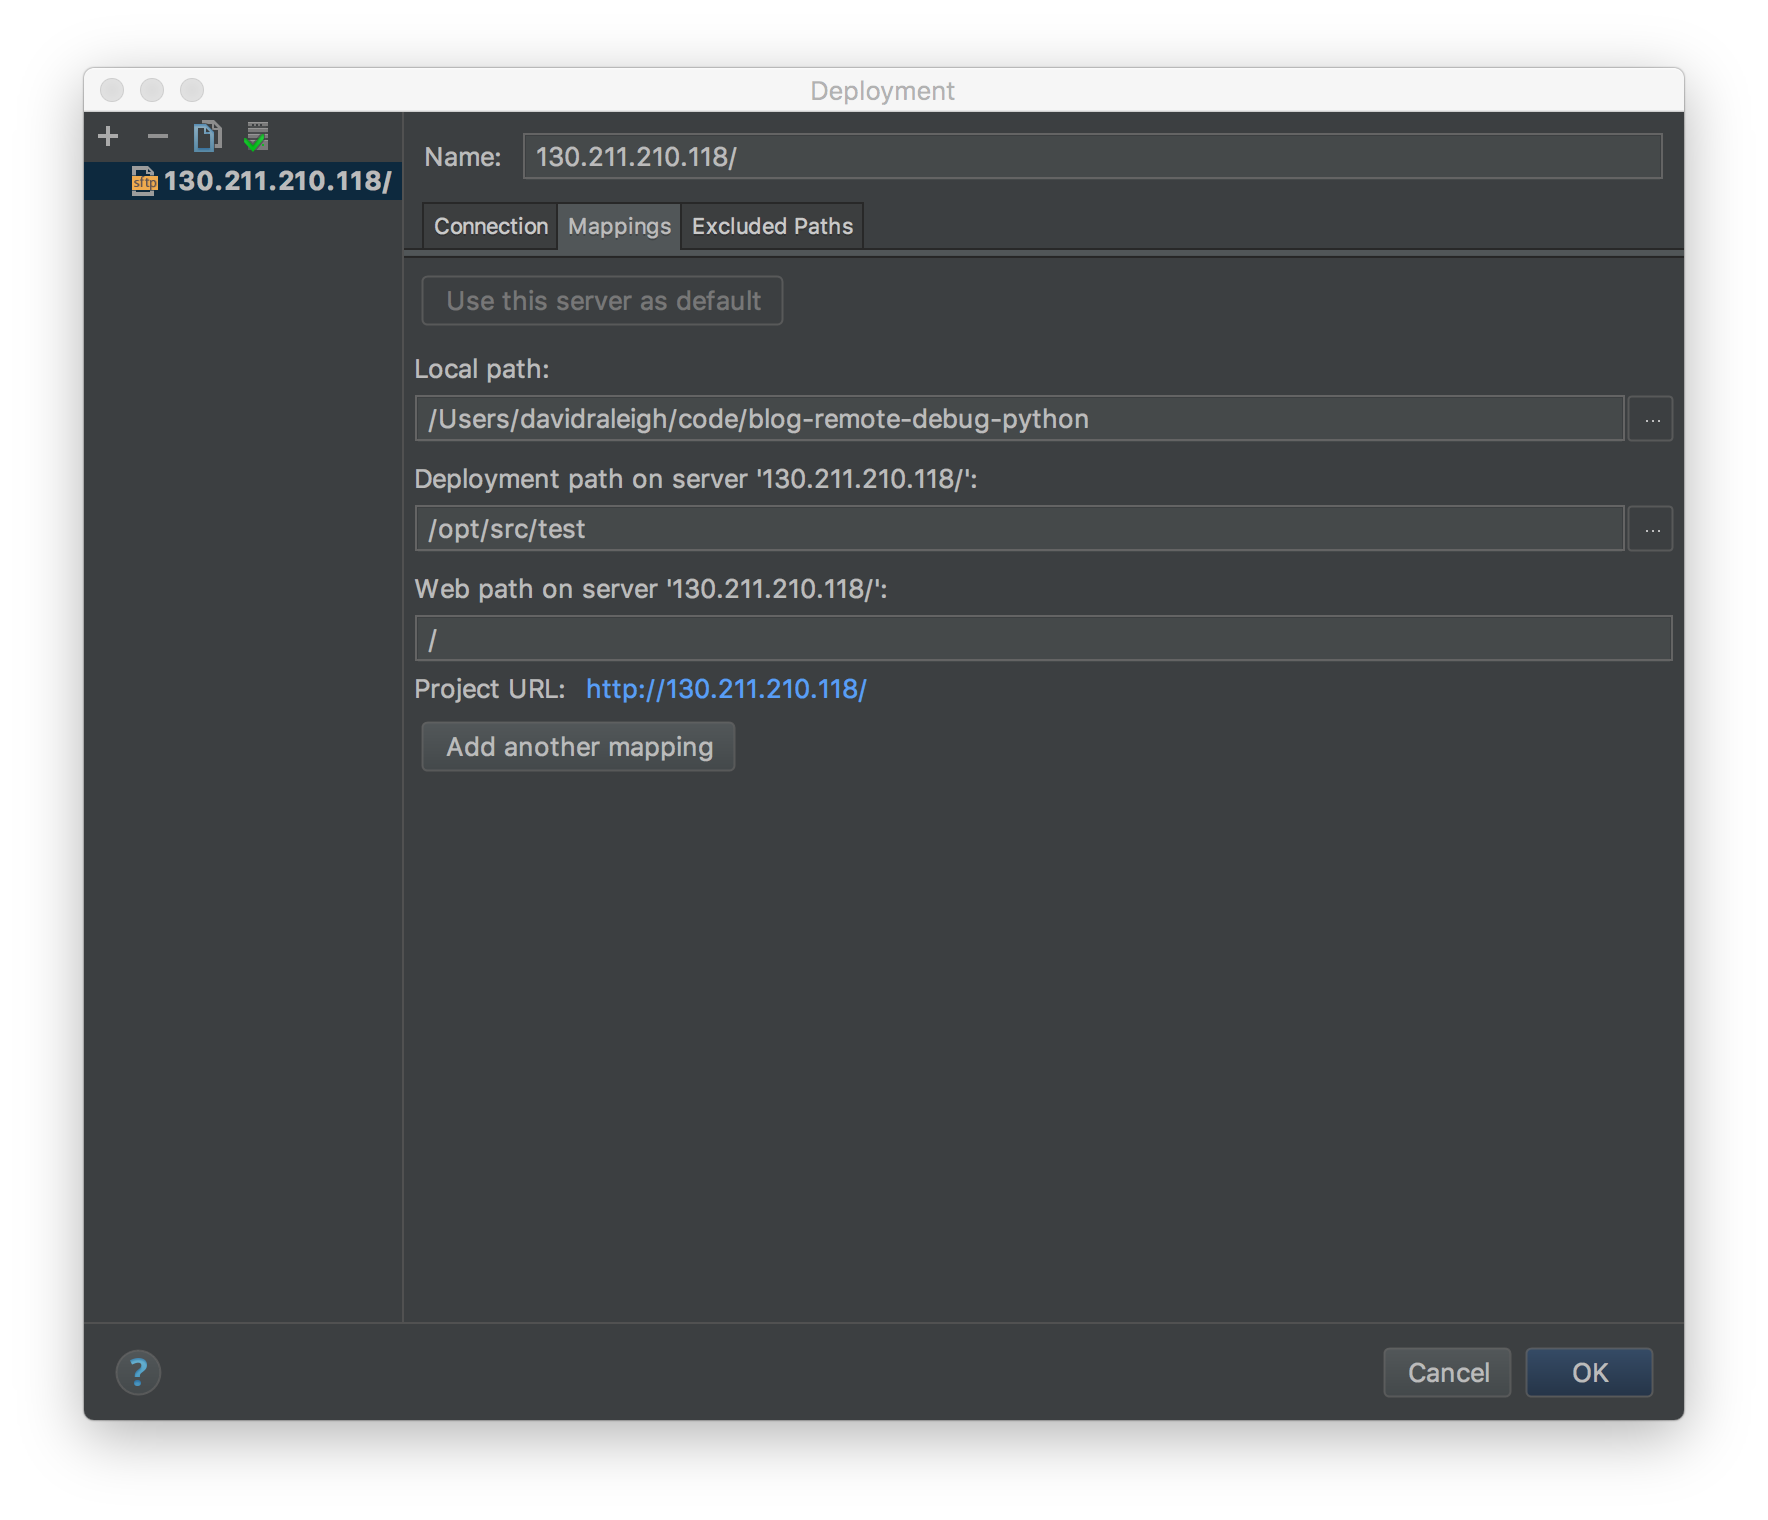
The Mappings tab in the Deployment diaglog should look the same as the Project Path Mappings from above:
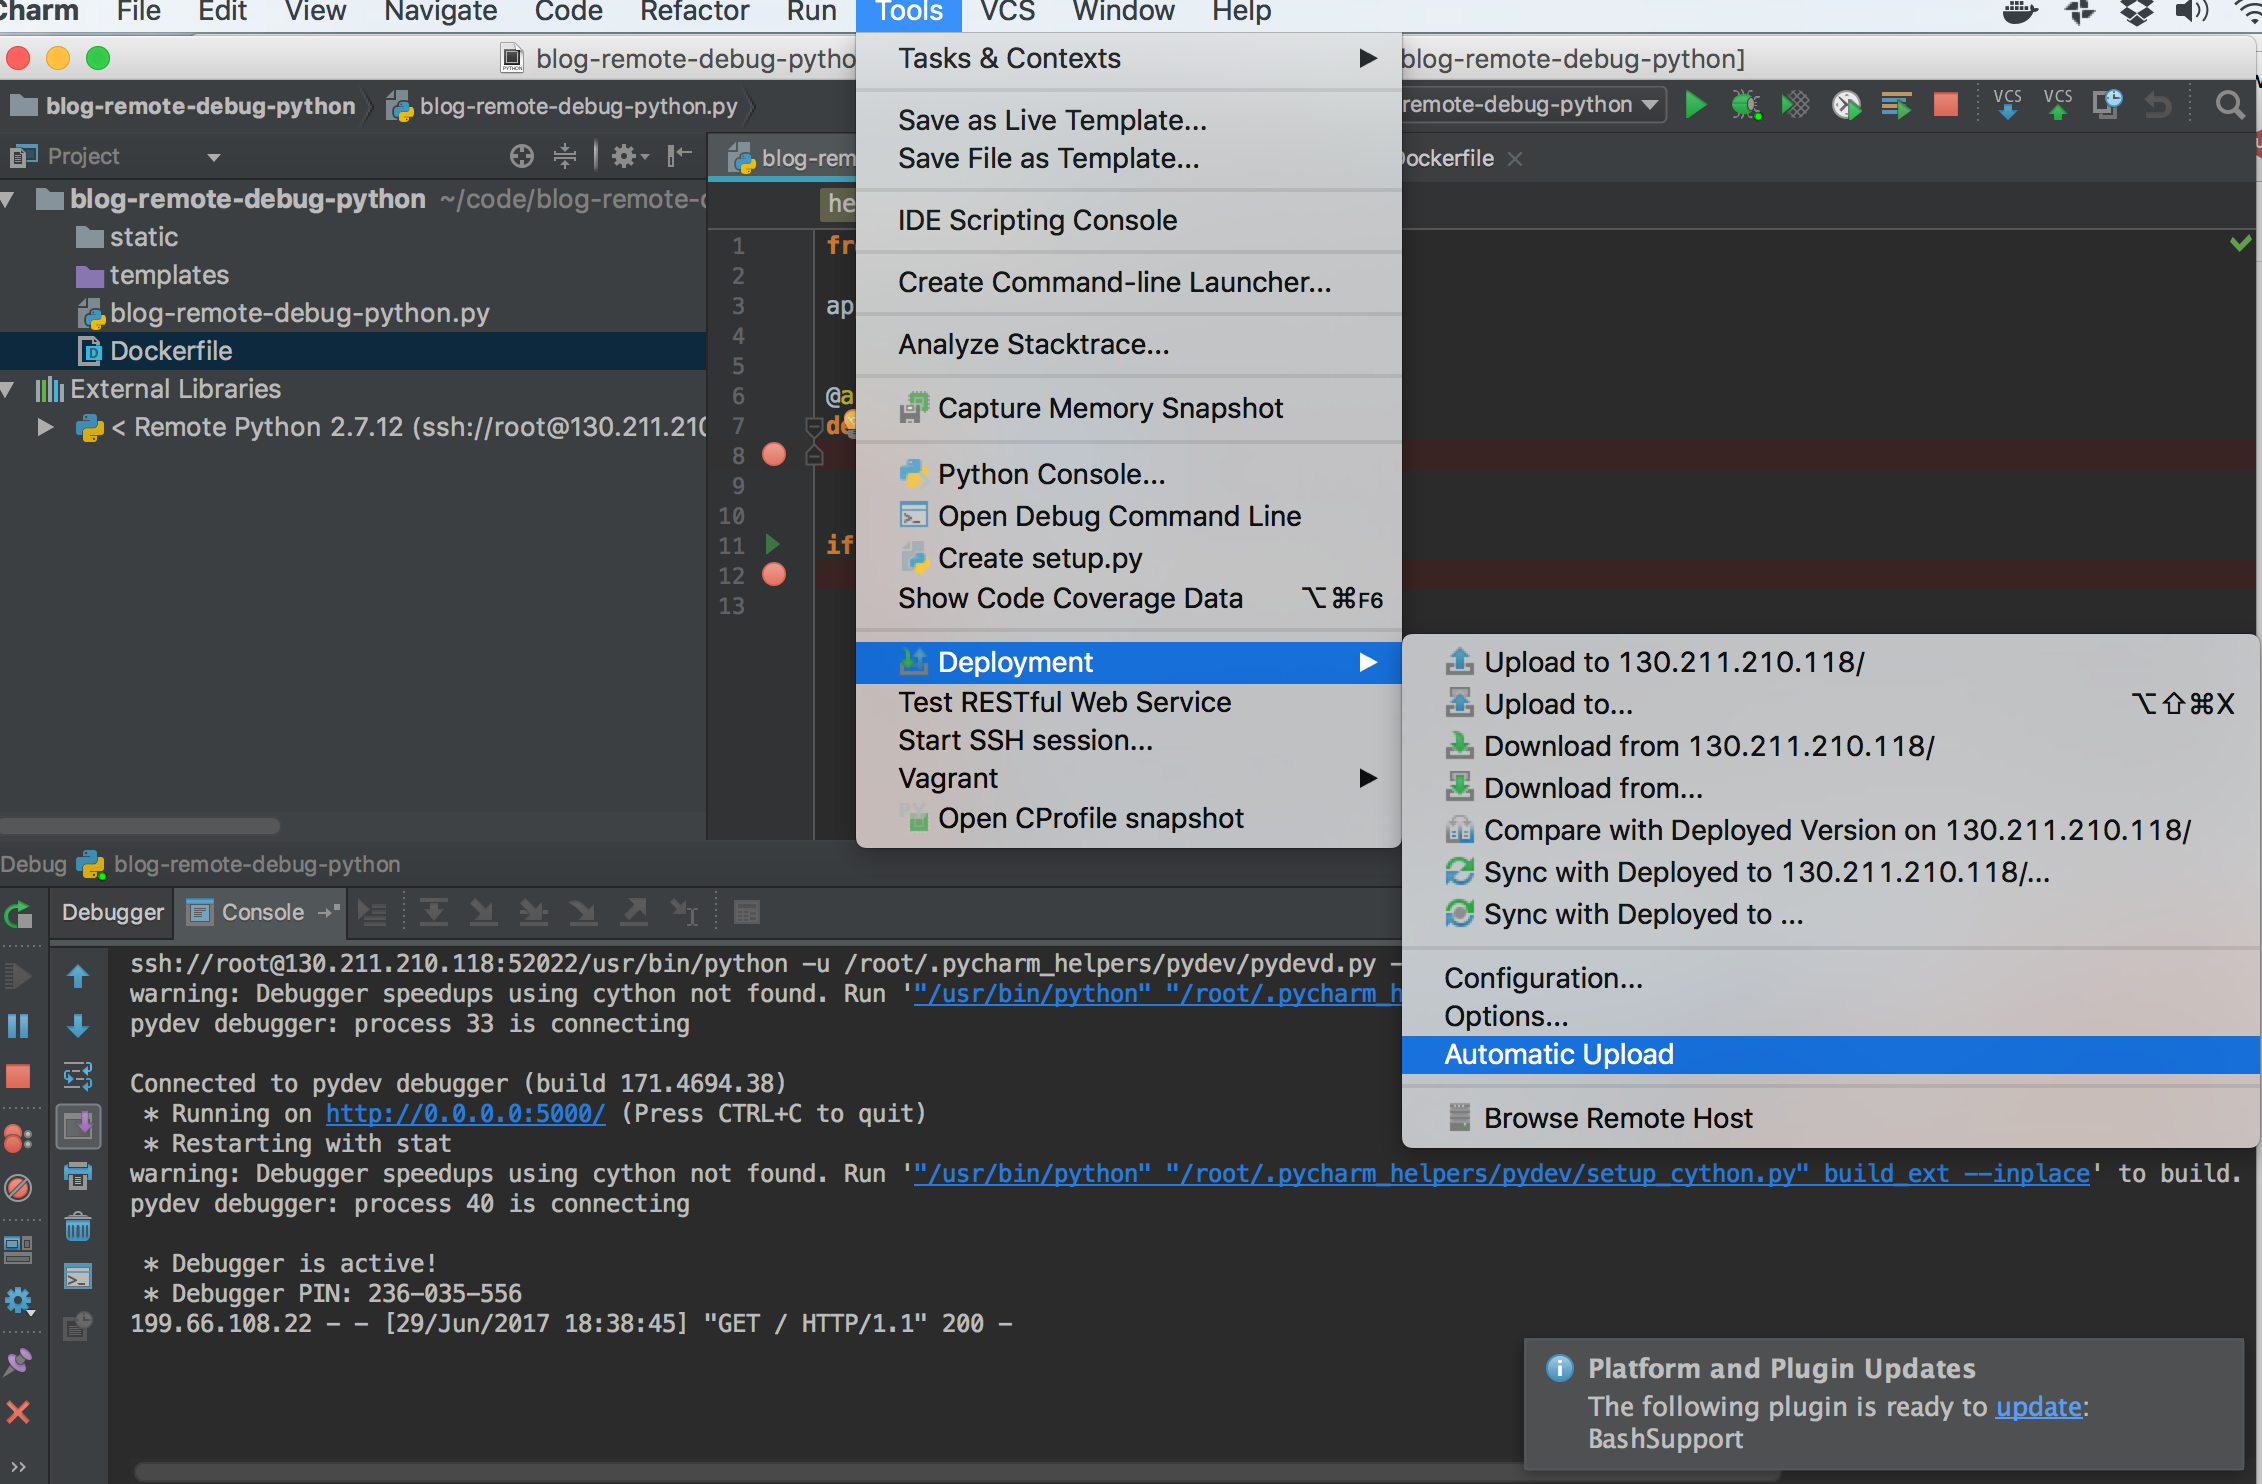
After selecting Ok in the Deployment dialog you can now upload development files from your local machine to your remote machine. I usually select Automatic so that I don’t have to right click a file and push it to my remote debug server after every edit:
Debugging
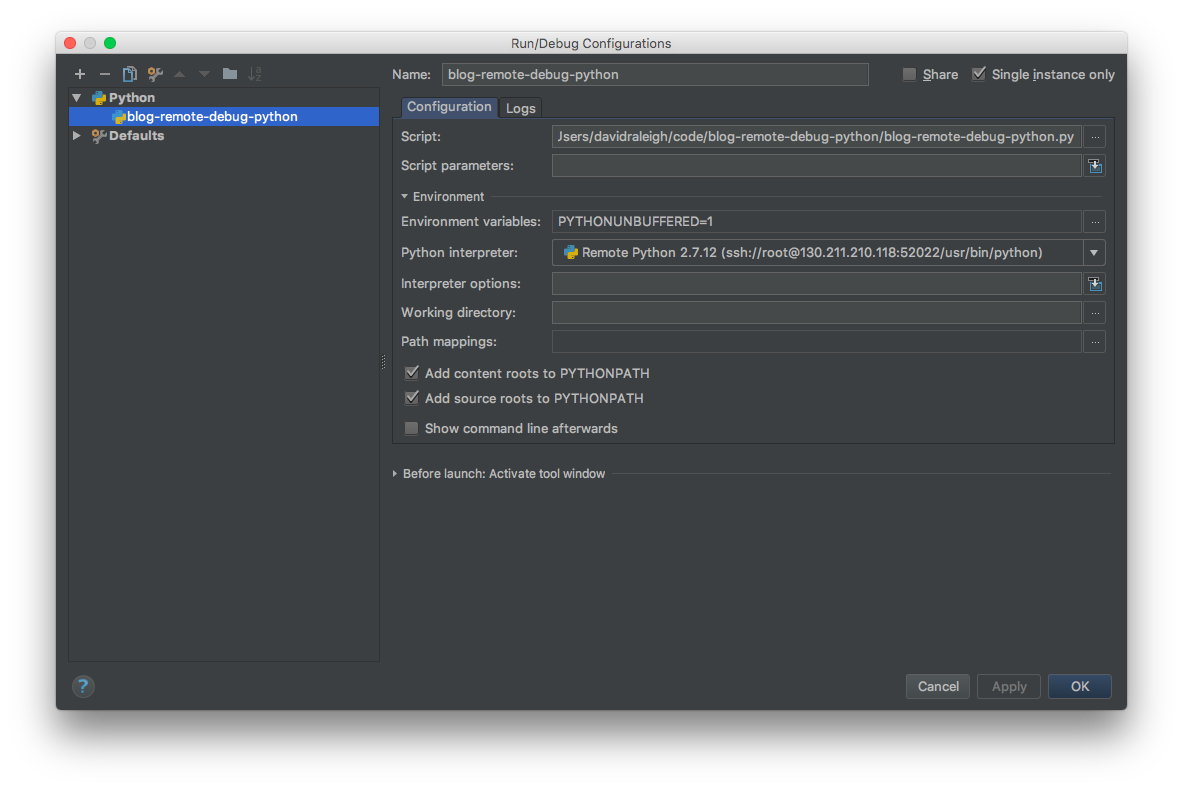
Using the Select Run/Debug Configuration dropdown in the Navigation Bar near the top of PyCharm select the Edit Configurations… option. You want to check to make sure that your Python interpreter is the remote interpreter we’ve just created and not one of your local python interpreters:
You should now be able to put a breakpoint at the Hello World line in the blog-remote-debug-python.py file in our sample project, press ^D to debug and once you visit the http address associated with your ip address (in my case http://130.211.210.118/) you’ll trigger the breakpoint and be able to look at the variables from your remote docker container. You also should be able to update the blog-remote-debug-python.py file, save it and those changes will be automatically uploaded to your container and demonstrated in your next debugging with PyCharm (sometimes those changes can be experienced within one debug session).
Rebuilding Image
There will be times when you’ll want to checkout a different branch. You could ssh into your container remotely or using the docker exec command from within your remote VM and then checkout a different branch (one that matches whatever branch is on your local machine). This will work pretty well for changes in branches.
At other times there will be large changes to a Dockerfile or an inherited image that requires a rebuild of a machine. To do so you’ll need to follow theses commands:
gcloud compute --project "blog-and-demos" ssh --zone "us-central1-f" "remote-debug-demo"
cd /opt/src/blog-remote-debug-python
sudo git pull origin master
sudo docker build -t your-special-image-name .
sudo docker tag your-special-image-name test-image
cd ~/remote-debug-docker/
sudo docker build -t debug-image .
sudo docker stop temp-python-debug
sudo docker rm temp-python-debug
sudo docker run -p 52022:22 -p 80:5000 -it --privileged --name=temp-python-debug debug-image
PyCharm will try to protect you from this new Docker container, so you’ll get a warning like this:

You can click Yes and all will work fine (unless someone just happens to be eavesdropping at the moment you rebuilt your docker image, but that seems unlikely).