Using Teamcity On Gcp With Docker
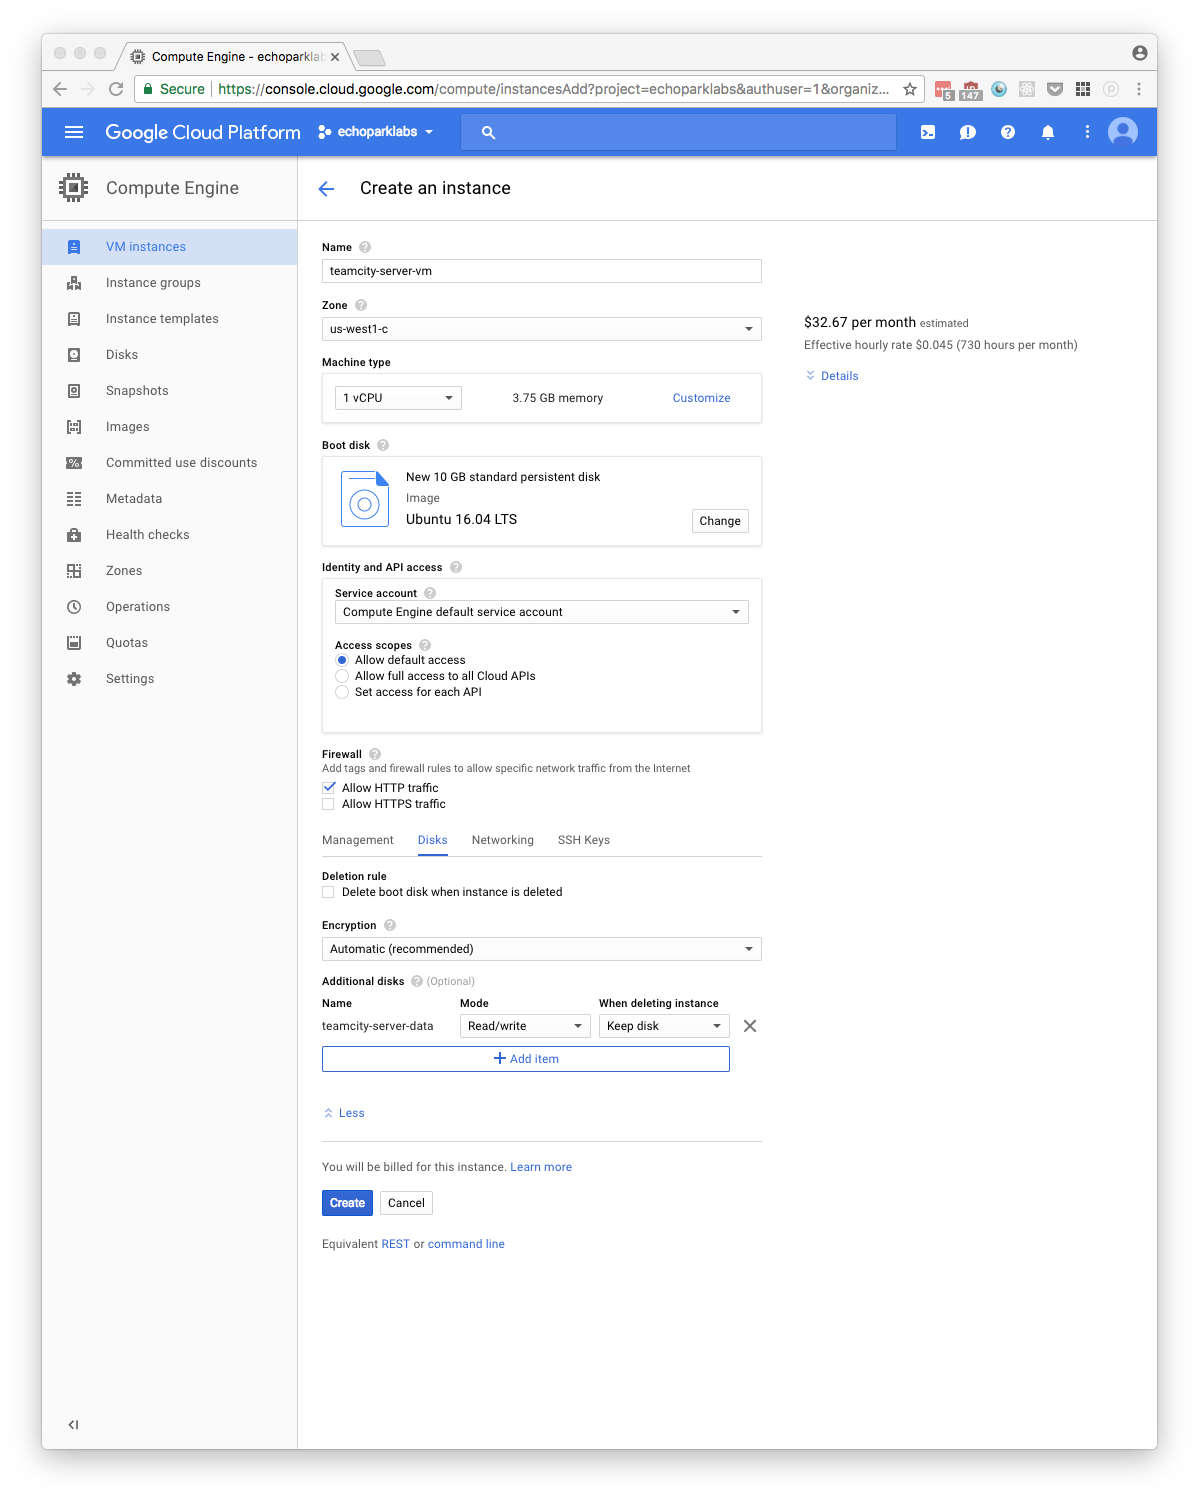
Create Instance
Install Docker
taken from https://docs.docker.com/engine/installation/linux/docker-ce/ubuntu/#install-using-the-repository
sudo apt-get remove docker docker-engine docker.io
sudo apt-get update
sudo apt-get install     linux-image-extra-$(uname -r)     linux-image-extra-virtual
sudo apt-get update
sudo apt-get install     apt-transport-https     ca-certificates     curl     software-properties-common
curl -fsSL https://download.docker.com/linux/ubuntu/gpg | sudo apt-key add -
curl -fsSL https://download.docker.com/linux/ubuntu/gpg
sudo apt-key fingerprint 0EBFCD88
echo $(lsb_release -cs)
sudo add-apt-repository    "deb [arch=amd64] https://download.docker.com/linux/ubuntu \
   $(lsb_release -cs) \
   stable"
sudo apt-get update
apt-cache madison docker-ce
sudo apt-get install docker-ce=17.03.2~ce-0~ubuntu-xenial
sudo docker run hello-world
mounting data disk
one thing I noticed is that this did not work well with the container optimized image provided by google (chromeos). It kept unmounting the disk after each shutdown. below is taken from : https://cloud.google.com/compute/docs/disks/add-persistent-disk
sudo lsblk
NAME   MAJ:MIN RM  SIZE RO TYPE MOUNTPOINT
sdb      8:16   0  200G  0 disk
sda      8:0    0   10G  0 disk
└─sda1   8:1    0   10G  0 part /
sdb is the mounted drive. now to format it.
sudo mkfs.ext4 -m 0 -F -E lazy_itable_init=0,lazy_journal_init=0,discard /dev/sdb
mke2fs 1.42.13 (17-May-2015)
/dev/sdb contains a ext4 file system
  last mounted on Tue Sep  5 20:30:57 2017
Discarding device blocks: done
Creating filesystem with 52428800 4k blocks and 13107200 inodes
Filesystem UUID: c38706b2-deb6-428c-a924-304018171052
Superblock backups stored on blocks:
  32768, 98304, 163840, 229376, 294912, 819200, 884736, 1605632, 2654208,
  4096000, 7962624, 11239424, 20480000, 23887872

Allocating group tables: done
Writing inode tables: done
Creating journal (32768 blocks): done
Writing superblocks and filesystem accounting information: done
now to mount it and change fstab so that on startup you will remount the drive.
sudo mkdir -p /mnt/disks/teamcity_data
sudo mount -o discard,defaults /dev/sdb /mnt/disks/teamcity_data
sudo chmod a+w /mnt/disks/teamcity_data/
sudo cp /etc/fstab /etc/fstab.backup
sudo blkid /dev/sdb
/dev/sdb: UUID="c38706b2-deb6-428c-a924-304018171052" TYPE="ext4"

echo UUID=`sudo blkid -s UUID -o value /dev/sdb` /mnt/disks/teamcity_data ext4 discard,defaults,nofail 0 2 | sudo tee -a /etc/fstab
UUID=c38706b2-deb6-428c-a924-304018171052 /mnt/disks/teamcity_data ext4 discard,defaults,nofail 0 2

cat /etc/fstab
LABEL=cloudimg-rootfs /  ext4 defaults  0 0
UUID=c38706b2-deb6-428c-a924-304018171052 /mnt/disks/teamcity_data ext4 discard,defaults,nofail 0 2
Run TeamCity Server from Instance
docker will create the datadir and logs directories in the mounted /mnt/disks/teamcity_data directory. Once you run this command keep the terminal window open so you can get the authentication token for the web portal super user login.
sudo docker run -it --name teamcity-server-instance \
  -v /mnt/disks/teamcity_data/datadir:/data/teamcity_server/datadir \
  -v /mnt/disks/teamcity_data/logs:/opt/teamcity/logs \
  -p 80:8111 \
  jetbrains/teamcity-server
Web Portal
Go to your ip address for this machine (if you didn’t allow http traffic in your vm instance this won’t work). Click proceed at the first window and accept the default TeamCity HSQLDB database from the dropdown if you haven’t setup a database for your TeamCity Server instance.
Accept your license agreement and then select “Login as Super user”
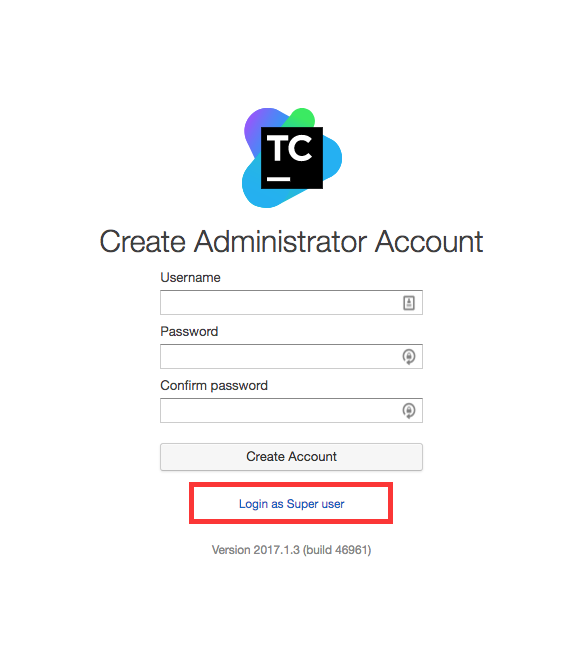
You click “Login as Super user” and in the terminal output from your above docker run command you’ll see the following:
[2017-09-05 21:56:49,815] INFO - jetbrains.buildServer.SERVER - Super user authentication token: "104771920120677263962". To login as Super user use an empty username and this token as a password on the login page.
Your number in the quotes will allow you to login as admin.
Running a TeamCity Agent
From the same instance we’ve installed TeamCity we’re going to run a TeamCity agent. mounting /var/run/docker.sock allows for docker-in-docker running of test containers. :
sudo docker run -it -e SERVER_URL="http://teamcity.yourfancyurl.io/" \
  -e AGENT_NAME=agent-1 \
  -v /home/davidraleigh/agent-1:/data/teamcity_agent/conf \
  -v /var/run/docker.sock:/var/run/docker.sock \
  --name="teamcity-agent-1" \
  jetbrains/teamcity-agent
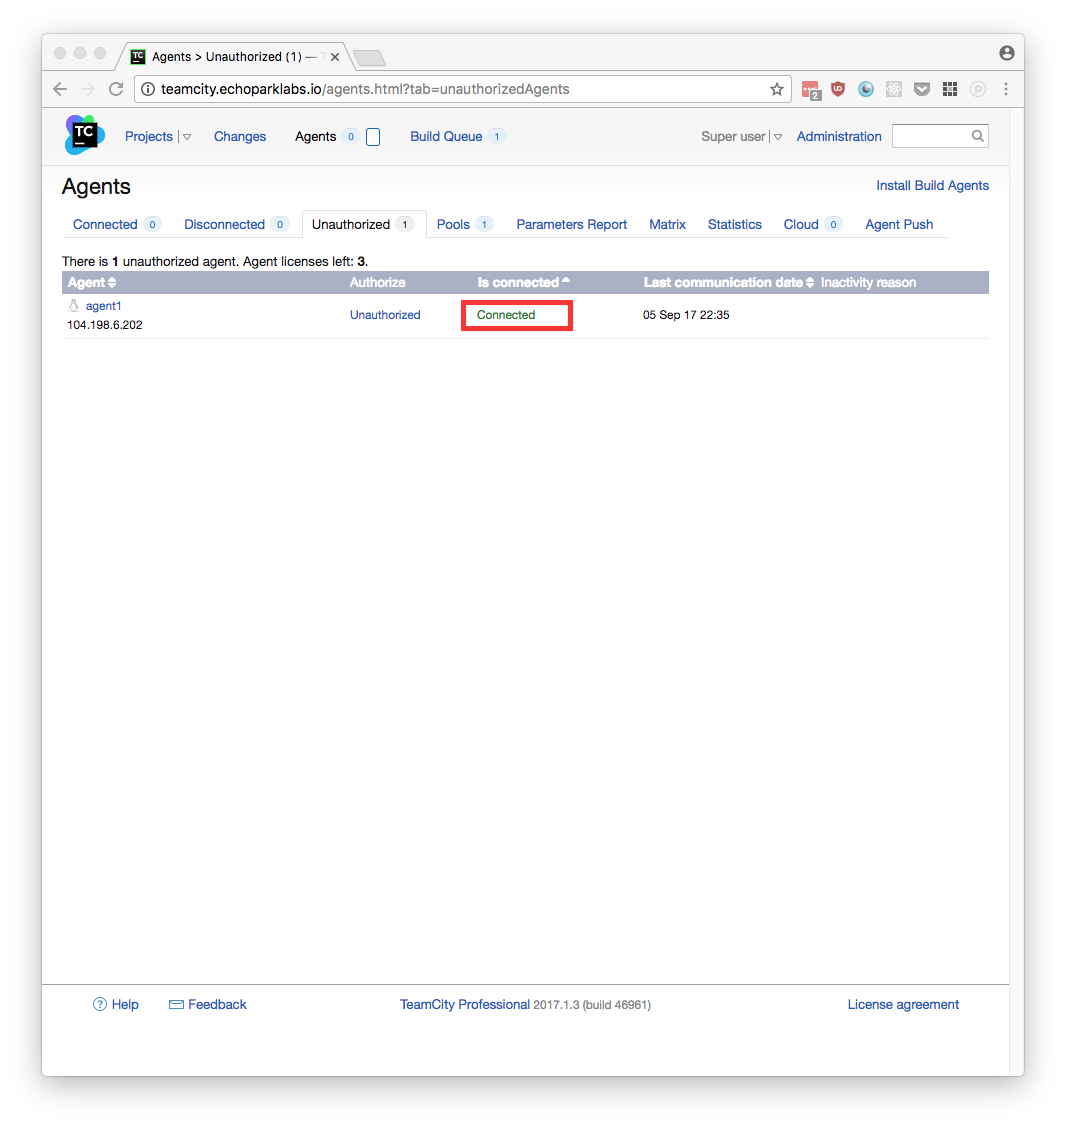
When you go to the Agents->Unauthorized tab in TeamCity, you’ll see a list of agents (at this point it should only show the one agent you just started). Your agent may take a little while to download all the latest libraries from TeamCity. Once it has downloaded all the necessary libraries it will say Connected in green as you see in this below image. Click the hyperlink to the left that says Unauthorized and then you will be able to approve your agent’s being associated with TeamCity.
Docker in Docker testing
I created a Test project with a temp build that wasn’t associated with any VCS. It had only one Command Line build step:
docker run hello-world
This should run and give you a set of results in the Build Log that looks like:
[22:44:48]Step 1/1: Command Line (4s)
[22:44:48][Step 1/1] Starting: /opt/buildagent/temp/agentTmp/custom_script7130264888871250564
[22:44:48][Step 1/1] in directory: /opt/buildagent/work/2b35ac7e0452d98f
[22:44:49][Step 1/1] Unable to find image 'hello-world:latest' locally
[22:44:50][Step 1/1] latest: Pulling from library/hello-world
[22:44:50][Step 1/1] b04784fba78d: Pulling fs layer
[22:44:51][Step 1/1] b04784fba78d: Verifying Checksum
[22:44:51][Step 1/1] b04784fba78d: Download complete
[22:44:51][Step 1/1] b04784fba78d: Pull complete
[22:44:51][Step 1/1] Digest: sha256:f3b3b28a45160805bb16542c9531888519430e9e6d6ffc09d72261b0d26ff74f
[22:44:51][Step 1/1] Status: Downloaded newer image for hello-world:latest
[22:44:51][Step 1/1]
[22:44:51][Step 1/1] Hello from Docker!
[22:44:51][Step 1/1] This message shows that your installation appears to be working correctly.
[22:44:51][Step 1/1]
[22:44:51][Step 1/1] To generate this message, Docker took the following steps:
[22:44:51][Step 1/1]  1. The Docker client contacted the Docker daemon.
[22:44:51][Step 1/1]  2. The Docker daemon pulled the "hello-world" image from the Docker Hub.
[22:44:51][Step 1/1]  3. The Docker daemon created a new container from that image which runs the
[22:44:51][Step 1/1]     executable that produces the output you are currently reading.
[22:44:51][Step 1/1]  4. The Docker daemon streamed that output to the Docker client, which sent it
[22:44:51][Step 1/1]     to your terminal.
[22:44:51][Step 1/1]
[22:44:51][Step 1/1] To try something more ambitious, you can run an Ubuntu container with:
[22:44:51][Step 1/1]  $ docker run -it ubuntu bash
[22:44:51][Step 1/1]
[22:44:51][Step 1/1] Share images, automate workflows, and more with a free Docker ID:
[22:44:51][Step 1/1]  https://cloud.docker.com/
[22:44:51][Step 1/1]
[22:44:51][Step 1/1] For more examples and ideas, visit:
[22:44:51][Step 1/1]  https://docs.docker.com/engine/userguide/
[22:44:51][Step 1/1]
[22:44:51][Step 1/1] Process exited with code 0
Updating TeamCity Server or TeamCity Agent
If you need to update your server it’s a breeze. SSH into your GCP instance and do the following.
Server:
sudo docker stop teamcity-server-instance
sudo docker rm teamcity-server-instance
sudo docker pull jetbrains/teamcity-server:latest
sudo docker run -it --name teamcity-server-instance \
  -v /mnt/disks/teamcity_data/datadir:/data/teamcity_server/datadir \
  -v /mnt/disks/teamcity_data/logs:/opt/teamcity/logs \
  -p 80:8111 \
  jetbrains/teamcity-server:latest
Agent:
sudo docker stop teamcity-agent-1
sudo docker rm teamcity-agent-1
sudo docker pull jetbrains/teamcity-agent:latest
sudo docker run -it -e SERVER_URL="http://teamcity.yourfancyurl.io/" \
  -e AGENT_NAME=agent-1 \
  -v /home/davidraleigh/agent-1:/data/teamcity_agent/conf \
  -v /var/run/docker.sock:/var/run/docker.sock \
  --name="teamcity-agent-1" \
  jetbrains/teamcity-agent:latest
Since all of your server’s data is stored on the mounted disks you don’t need to worry about deleting your containers.
Using an Agent that Has GCP Gcloud Permissions
Using this Docker file: https://raw.githubusercontent.com/GoogleCloudPlatform/cloud-sdk-docker/ad2078cacf943d005069f48f23c36a8a4aa4dadb/Dockerfile
We can create a Dockerfile for TeamCity Agent that inherits also gets all the benefits of inheriting instance permissions. This way all we need to do when pulling, pushing and building images from gcr.io is use the gcloud docker -a command first.
Here is the Dockerfile I created using the above GCP Dockerfile:
FROM jetbrains/teamcity-agent

ENV CLOUD_SDK_VERSION 168.0.0

ARG INSTALL_COMPONENTS
RUN apt-get update -qqy && apt-get install -qqy \
        curl \
        gcc \
        python-dev \
        python-setuptools \
        apt-transport-https \
        lsb-release \
        openssh-client \
        git \
    && easy_install -U pip && \
    pip install -U crcmod && \
    export CLOUD_SDK_REPO="cloud-sdk-$(lsb_release -c -s)" && \
    echo "deb https://packages.cloud.google.com/apt $CLOUD_SDK_REPO main" > /etc/apt/sources.list.d/google-cloud-sdk.list && \
    curl https://packages.cloud.google.com/apt/doc/apt-key.gpg | apt-key add - && \
    apt-get update && apt-get install -y google-cloud-sdk=${CLOUD_SDK_VERSION}-0 $INSTALL_COMPONENTS && \
    gcloud config set core/disable_usage_reporting true && \
    gcloud config set component_manager/disable_update_check true && \
    gcloud config set metrics/environment github_docker_image
VOLUME ["/root/.config"]
Now instead of using the jetbrains/teamcity-agent image I use this custom image for my agents.
Deleting GCP Instance and Installing on new GCP Instance
Sometimes we need to delete a GCP instance and get a new VM. Here are the instructions to start your server up again without losing any of your information:
After SSH’ing into your instance you need to mount the drive. Do NOT Format the drive!!! Up above we formatted the drive to prepare it for it’s first use, but if you do that now you’ll lose all of your CI information
sudo lsblk
sudo mkdir -p /mnt/disks/teamcity_data
sudo mount -o discard,defaults /dev/sdb /mnt/disks/teamcity_data
sudo chmod a+w /mnt/disks/teamcity_data/
sudo cp /etc/fstab /etc/fstab.backup
echo UUID=`sudo blkid -s UUID -o value /dev/sdb` /mnt/disks/teamcity_data ext4 discard,defaults,nofail 0 2 | sudo tee -a /etc/fstab
Calling cat /etc/fstab you should see something like this:
LABEL=cloudimg-rootfs	/	 ext4	defaults	0 0
UUID=c38706b2-deb6-428c-a924-304018171052 /mnt/disks/teamcity_data ext4 discard,defaults,nofail 0 2
Now use docker to startup your teamcity server that mounts the directory with all your previous instance’s information:
sudo docker run -it --name teamcity-server-instance \
  -v /mnt/disks/teamcity_data/datadir:/data/teamcity_server/datadir \
  -v /mnt/disks/teamcity_data/logs:/opt/teamcity/logs \
  -p 80:8111 \
  jetbrains/teamcity-server
and start the teamcity agent:
sudo docker run -it -e SERVER_URL="http://teamcity.echoparklabs.io/" \
  -e AGENT_NAME=agent-1 \
  -v /home/davidraleigh/agent-1:/data/teamcity_agent/conf \
  -v /var/run/docker.sock:/var/run/docker.sock \
  --name="teamcity-agent-1" \
  jetbrains/teamcity-agent